crafts & knitting · free patterns · general stuff

mr Ro-bot

Thanks so much for the lovely welcome back. Things here are settling nicely back into a manageable routine and although Toby isn’t yet calm and content he’s definitely changed his mood for the better.

I’ve really enjoyed picking up the needles again and have finished off Mr Ro-bot who has been delivered to the reception class teacher at school in time to meet this year’s new children. I love the thought that he’ll be a friendly helper in their learning.

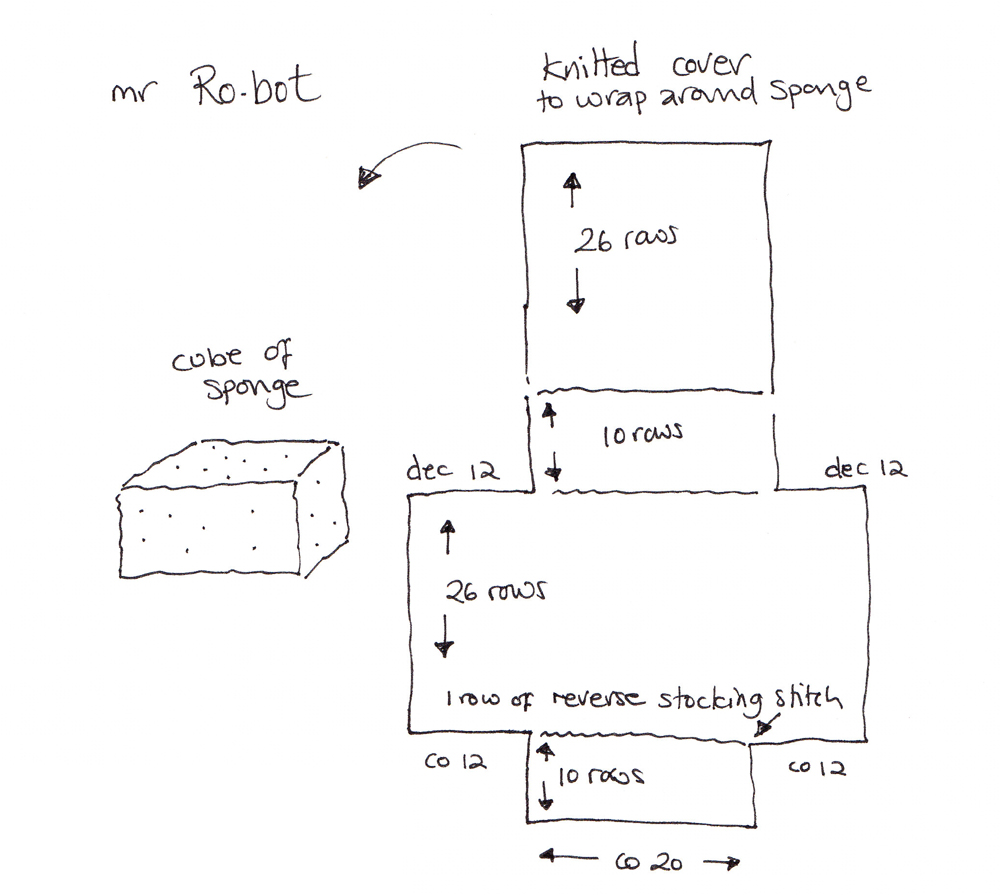
At the moment I’m not going to write up a full pattern for him but I’ll run you through how I made him. I used 5 different shades of Rico Creative Cotton and 3.5mm needles and I do have some of each shade left over so 5 balls is plenty. I used 2 decorator / car wash sponges which were approx 13 x 20cms and 5cms deep. I chopped one sponge in half and used 1 half for the head while the other half I cut in half again to make 2 feet. I trimmed the second sponge for his body. I have this sketch which shows how I constructed the blocks (these measurements were for the feet and the head and body were larger).

For the legs I cast on 28 stitches and worked 20 rows alternating between 4 rows of 2 separate colours. I sewed the back seam up to make a tube and then sewed this to the top of the foot before stuffing it firmly and then sewing it to the finished body. The arms were just my knitted christmas stocking pattern with more rows at the end to form the hand. I ran a length of thread through the back of the knitting at the wrist to gather it in and tied it off after stuffing the hand before finishing sewing up and stuffing the arm. The fingers were i-cords of 3 stitches and 8 rows.

The โ€˜earsโ€™ are knitted in the round – starting off with 20 stitches and over several rows decreasing until 8 remained then gathering the remainder to make a sort of bobble and stuffing them before sewing them to the sides of the head. I did the same with the antennae but carried on until 3 stitches remained and then did a short i-cord. I didn’t stuff the bobble but squashed it flat and sewed it in place. The eyes are knitted bobbles in white 4 ply yarn and the smile is a 6 cm i-cord in 4ply yarn and 2.5mm needles sewn on.

If you wanted to make a similar robot of your own I’d start by cutting your cubes of sponge up first. Then cast on as many stitches as you think you’ll need and match your knitting to fit – that’s what I did but I didn’t keep decent notes. I do remember that I put a reverse stocking stitch to mark the corners as this gives the knitted fabric a natural right angle bend.

If I get the chance to make another one in future I’ll keep better notes and try to write up a proper pattern to share.

crafts & knitting · free patterns

winter woollies

Phew! After the illnesses of the last few weeks all has returned to normal here at our house and so I’m enjoying some quiet knitting time in the autumn sun. As usual at this time of year my thoughts have turned to Christmas and I’m busy working on a seasonal batch of toys with nordic jumpers like last year. I have set myself the difficult task of keeping them all different both from each other and from the ones I’ve made before so I’m having fun playing around with combinations of various nordic designs and cables.

I’ve also been wearing my new wrist-warmers on the walk to school each morning – it’s getting a bit nippy first thing!


They’re so easy to make as there’s no shaping at all and they’re comfy and warm to wear – a bit like having very long sleeves that you can pull down to your knuckles. Here’s a quick pattern:

The Baby Cashmerino yarn that I used is 125m long and this was just enough (with around 2m spare) for the 2 wrist-warmers so use any DK yarn but check the yardage.

Using 3mm / 11UKย  / 2-3US needles and any DK weight yarn cast on 54 stitches.

work 10 rows of K2, P2 ribbing (i.e K2, P2 on right side, P2, K2 on reverse)
Row 11: start the double moss stitch pattern – K2, P1, K1 to end
Row 12: P1, K1 to last 2 stitches, P2
Row 13: K1, P1 to last 2 stitches, K2
Row 14: P2, K1, P1 to end

repeat these 4 rows 11 more times (giving a total of 48 rows of double moss pattern)
next row: K2, P2 to last 2 stitches K2
continue in ribbing for another 8 rows and then cast off.

Sew up the side seam with mattress stitch (which is virtually invisible) and pop them on!

Happy knitting and happy weekend!

crafts & knitting · free patterns

fairy cake T-shirt

Toby seemed to cope well yesterday and was pretty calm and happy after arriving home on the minibus. It’s so strange not having him around in the day and I’m like a butterfly – just flitting from one thing to another. As usual knitting is keeping me sane! I’ve been playing around with ideas and considering that knitted corsages are ‘all that’ right now I thought I’d vary the theme. The result is a knitted badge / T shirt decoration on my favourite theme of fairy cakes. Modeled here by the lovely Amy:

The instructions to make it are below:

Abbreviations:

K = Knit, P = Purl

PF&B: Purl into the front and back of the stitch so increasing a stitch.

K2tog: Knit 2 stitches together, so decreasing by one.

P2tog: Purl 2 stitches together, so decreasing by one.

K2togtbl: Knit 2 stitches together through their back loops, so decreasing by one.

P2togtbl: Purl2 stitches together through their back loops, so decreasing by one.


Pattern:

Using 2.75mm (US 2) needles and 4ply/DK weight cream yarn, Cast on 15 stitches for the cake case
Row 1:ย  ย (K1, P1) 7 times, K1
Row 2:ย  ย (P1, K1,) 7 times, P1
Row 3:ย  ย as row 1
Row 4:ย  ย as row 2
Row 5:ย  ย as row 1
Row 6:ย  ย as row 2
Row 7:ย  ย as row 1
Row 8:ย  ย as row 2
Row 9:ย  ย K1, (PF&B, K1) 7 timesย  (22 stitches)
Row 10: (P1, K2) 7 times, P1
Row 11: (K1, P2) 7 times, K1
Row 12: Cast off, keeping ribbing correct, cut the yarn from the work leaving a short tail for weaving in later.

Row 13: With chocolate cake coloured yarn pick up and knit 15 stitches from the back of the finished case (around 1 row down from the cast off edge) taking 1 alternately from the purl rib and 1 from the knit rib.
Row 14: Purl
Row 15: Change yarn to pink colour for the icing and knit 1 row
Row 16: Knit
Row 17: Purl
Row 18: Knit
Row 19: P2tog, P11, P2togtbl
Row 20: K2togtbl, K9, K2tog
Row 21: P2tog, P7, P2togtbl
Row 22: K2togtbl, K5, K2tog
Row 23: P2tog, P3, P2togtbl
Row 24: Cast off remaining stitches, cut the yarn from the work leaving a short tail for weaving in later.

Cherry on the top:
Cast on 4 in red yarn.
knit 1 row
(P2tog) twice, pass 1st stitch over the second and pull end through to secure.

alternatively you could use a fabric flower instead of the cherry or cut a small circle of red felt.

To Finish:
Sew cherry on to top. Sew in ends neatly on reverse. Sew on beads / sequins and attach to T-shirt / tea cosy / greeting card etc…


Copyright ยฉ Julie Williams 2006.