
This post details the decrease methods most used in my range of Little Cotton Rabbits patterns, with pictures for each method and details of their specific characteristics so that they can be compared and contrasted. I’ve also put together a PDF file that you can download to keep or print out if preferred: Download PDF file
. . . . . . . . . . . . . . . . . . . . . . . . . . . . . . . . . . . . . . . . . . . . . . . . . . . . . . . . . . . . . . . . . . . . . . . .
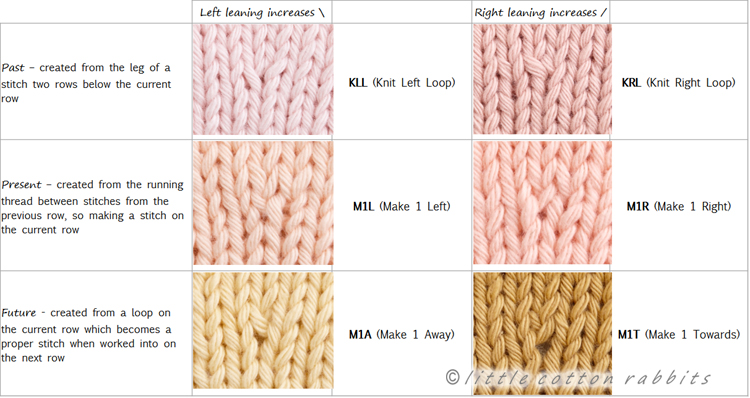
A comparison of decreases:

This table compares four paired and mirrored decreases, these are the decreases that I use most often in my patterns.
As you can see they are grouped vertically according to the direction in which the decrease stitch leans (either to the left or to the right) and also grouped horizontally as matched symmetrical pairs which mirror each other.
. . . . . . . . . . . . . . . . . . . . . . . . . . . . . . . . . . . . . . . . . . . . . . . . . . . . . . . . . . . . . . . . . . . . . . . .
Double decreases:
CDD: centred double decrease:
This is a lovely decrease that removes 2 stitches from the work at the same time. As its name suggests, it is centred and therefore symmetrical. I use it a lot because it is so neat and attractive.
The most important thing to remember is to begin by slipping the two stitches TOGETHER and NOT one at a time. This twists them and changes their order and is vital to creating the neat and symmetrical finish.
Method:
Slip 2 stitches together as if to Knit them,
Knit the next stitch,
and then pass the 2 slipped stitches over it and off the needle.
. . . . . . . . . . . . . . . . . . . . . . . . . . . . . . . . . . . . . . . . . . . . . . . . . . . . . . . . . . . . . . . . . . . . . . . .
Right Leaning decreases:
K2tog: Knit two together:
This is a simple method for decreasing a single stitch on the right (front) side of the work, and is probably the best known method of decreasing by one stitch.
Because the left stitch crosses in front of the right stitch this creates a decrease that leans towards the right.
Method: Knit two stitches together at the same time, in exactly the same way that you would Knit a single stitch.
. . . . . . . . . . . . . . . . . . . . . . . . . . . . . . . . . . . . . . . . . . . . . . . . . . . . . . . . . . . . . . . . . . . . . . . .
P2TOG: Purl two together:
This creates a right leaning decrease, identical to K2tog above, but is worked on the wrong (reverse) side of the work.
Method: Purl two stitches together at the same time, in exactly the same way that you would Purl a single stitch.
I prefer to work decreases on the right (front) side of the work so don’t often use this decrease, unless it is part of a decorative stitch pattern. But I do use it when extra decreases need to be made that could not comfortably be fitted in on the previous right side row.
. . . . . . . . . . . . . . . . . . . . . . . . . . . . . . . . . . . . . . . . . . . . . . . . . . . . . . . . . . . . . . . . . . . . . . . .
Left Leaning decreases:
P2tog tbl: purl two together through the back loops:
This stitch creates a left leaning decrease, identical to SSK below, but is worked on the wrong (reverse) side.
Method: Purl 2 stitches together through the back loops.
This is done in order to twist the stitches and swap their positions, so that from the front of the work the right stitch crosses in front of the left stitch, creating a decrease that leans towards the left. This can be a little tricky to work, so it helps to have needles with pointy tips.
I prefer to work decreases on the right (front) side of the work so don’t often use this decrease, unless it is part of a decorative stitch pattern. But I do use it when extra decreases need to be made that could not comfortably be fitted in on the previous right side row.
. . . . . . . . . . . . . . . . . . . . . . . . . . . . . . . . . . . . . . . . . . . . . . . . . . . . . . . . . . . . . . . . . . . . . . . .
SSK: Slip, slip, knit:

This is a simple method for decreasing a single stitch on the right (front) side of the work. Because the right stitch crosses in front of the left stitch this creates a decrease that leans towards the left.
Please note: It is important to slip each stitch individually from the left to the right needle in Step 1 below, and to slip both stitches together at the same time from the right needle back to the left needle in Step 2.
Method:
Step 1: Slip a stitch (as if to Knit it) to the right-hand needle, slip a second stitch in the same way
Step 2: Slip both stitches together back to the left-hand needle and Knit them together through their back loops.
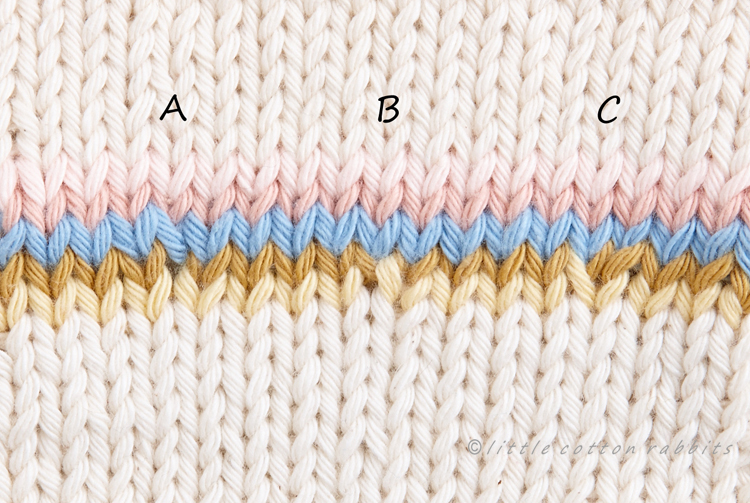
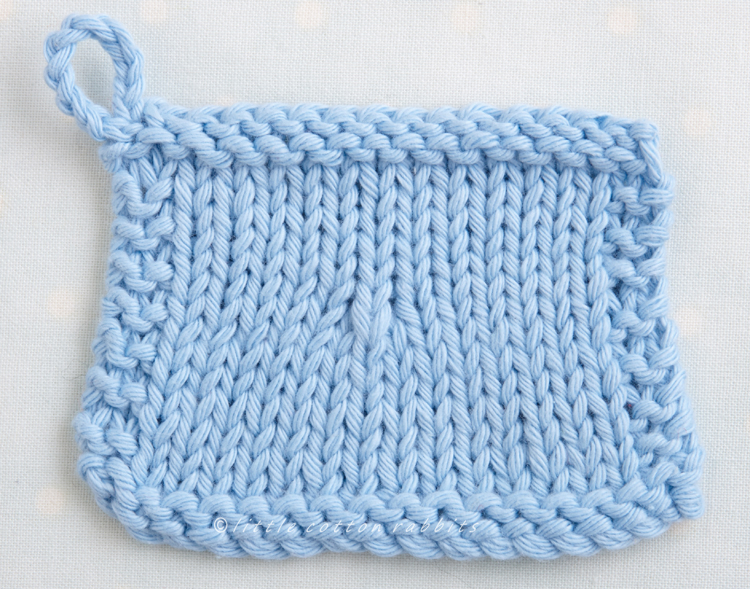
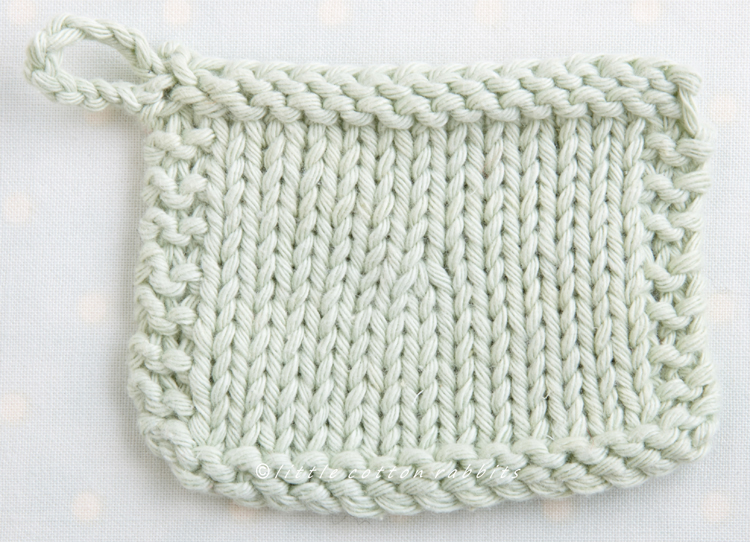
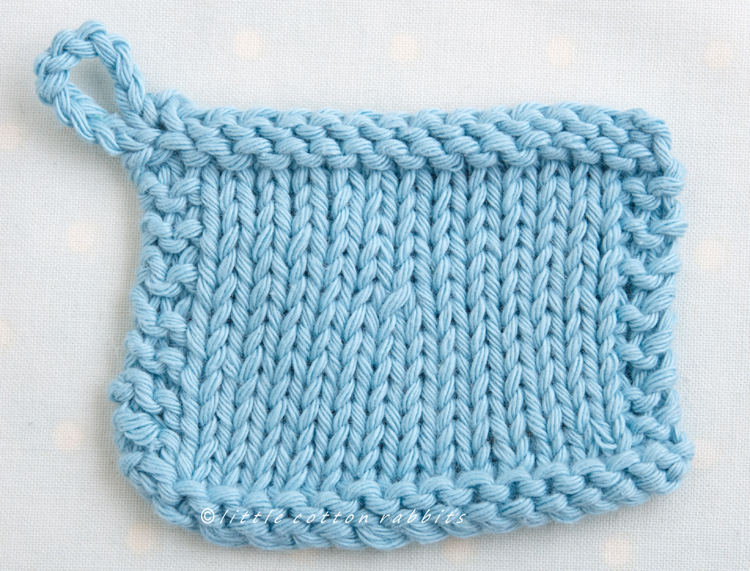
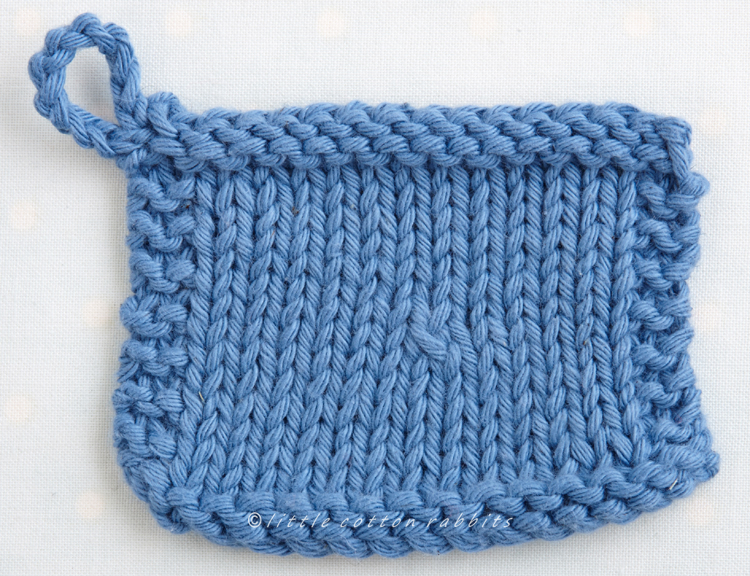
There is however a problem with this decrease stitch which occurs when it is used in a stacked way over several alternate rows. And that is because the SSK decrease goes against the natural direction of regular Knit and Purl knitting stitches. The SSK decrease stitch leans to the left and yet on the following row when you work a normal Purl stitch above the decrease this naturally leans to the right.
The result of this is a stepped line of decreases in the work, like a zig-zag pattern, and the finished result is not particularly neat (see the green sample below).
So, in order to smooth the step-like appearance we can use a little trick. There are several different ways of doing this, if you’d like to explore that further then please google ‘smooth SSK knitting’ or ‘neater SSK knitting’ and this will bring up a host of video tutorials and you can compare and decide which is your favourite method, my favourite is below.


My preferred method is to work the SSK decrease exactly as described at the top of the page. And then, on the following wrong side row, Purl the single stitch above it through the back loop (PTBL).
This twists the stitch that is above the decrease slightly, making it change direction so that it lies a little flatter, and creates a much smoother line of decreases (see the blue sample above):
This method of smoothing the stacked line of decreases comes in very handy in a couple of my patterns: especially the nose of the foxes, the bib of the dungarees, the armholes of the cable panelled sweaters. But to be honest, for the sake of neatness, I always PTBL the stitch above any SSK decreases.
. . . . . . . . . . . . . . . . . . . . . . . . . . . . . . . . . . . . . . . . . . . . . . . . . . . . . . . . . . . . . . . . . . . . . . . .
Other sources of information and tutorials:
There are lots of tutorials and videos available on the internet that demonstrate how to work these decrease techniques. These can form an invaluable resource for any knitter who wants to hone their craft. Because it’s not length of time that creates an experienced knitter, but the depth and breadth of their knitting skill base.
Here are a few of my favourite sites all of which have good video or step by step tutorials for these decrease methods (and many other knitting techniques too):