During writing up the first of my animal patterns it’s been hard to know just how much detail to go into. I didn’t want the patterns to only cover the written knitting instructions with a few lines about assembling the toy almost as an afterthought. Instead I wanted them to include as much detail of the finishing process as possible because I think that is a hugely important part of making them. But there is a limit to what you can pack in to a pattern and so I thought I’d write up some extra notes here on the blog that can be referred to if needed. These extra posts will be categorised under ‘knitting tips’ and the first of these ‘knitting tips’ posts is about Fair Isle/stranded colourwork knitting.
Through chatting with knitting friends it seems that stranded knitting is generally thought to be quite difficult. It really isn’t though. It is a little bit fiddly and takes a little patience and practice to get right but it is perfectly achievable for anyone who can already knit and purl.
There are tons of instructions, diagrams and videos out there on the internet and plenty of books published on the subject and I’m not intending to cover every conceivable aspect of Fair Isle. Instead I’d like to write up notes on the way that I work stranded / Fair Isle and
some tips I’ve learnt along the way to iron out some of the difficulties that are commonly experienced. It is worth pointing out that I knit English style, with both colours in my right hand, so my notes below are written for that way of working. If you knit continental style with a colour in either hand then check out this video or try a search on You Tube as there are lots of other good ones.
Colour dominance:
When you knit a design with two colours you are constantly switching between them and it is really important to be consistent with the order in which you use them. By this I mean which yarn is stranded over the top of the other at the back of the work when it is not the colour being knitted with at the time. It is generally accepted that the yarn stranded beneath will be the more dominant colour in the design.
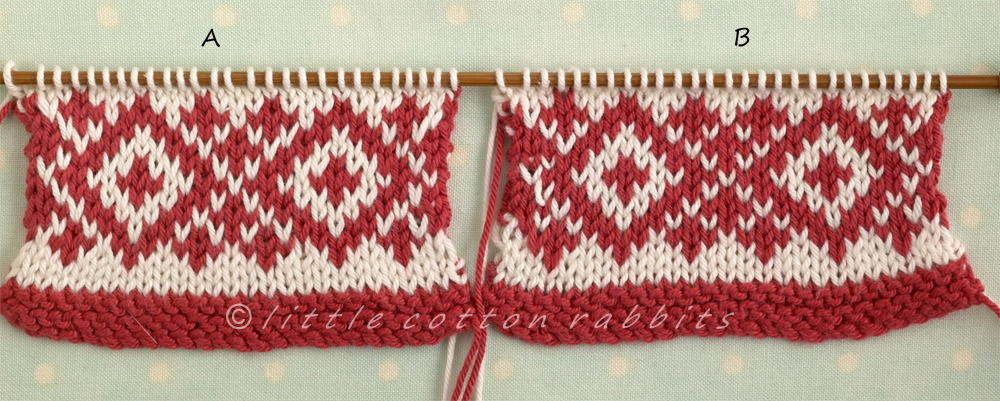
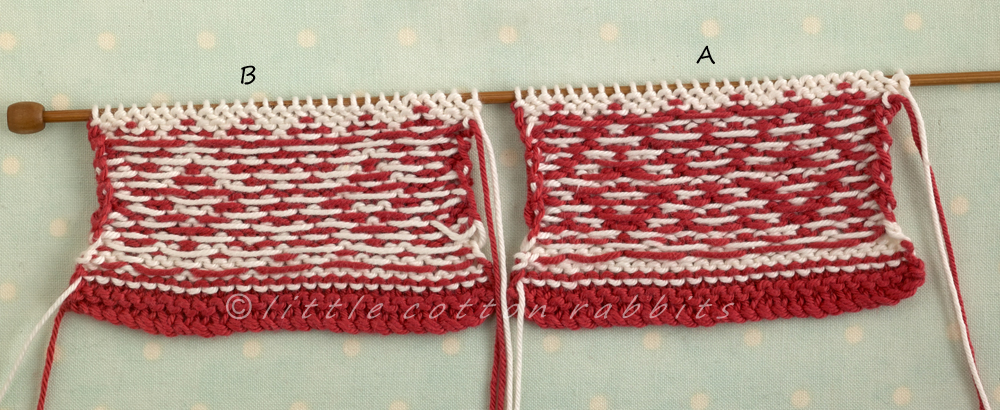
For example, the two samples below are knitted in the same colours and to the same pattern. The only difference is that in sample A the cream yarn is stranded below the red yarn and in sample B the red yarn is stranded below the cream.


Because of this difference I usually strand the accent colour below the main background colour (as in sample B above). You can choose either way but the most important thing is to be consistent if you want your finished piece to look neat and even.
There is a lovely post here about the perils of ignoring yarn dominance!
Catching up the yarn at the back of the work:
When there are gaps between sections of a pattern worked in the same colour the strands of un-worked yarn that travel across the back of the work are called floats.

It is generally suggested that floats should not strand across more than 7 stitches but my preference is for no more than 4 stitches. If I have to strand yarn across 5 or more stitches I always catch up my floats and usually in the centre of the span.
Lots of people only catch up their floats with a single wrap but I have found that my knitting looks much neater with a double catch up.
How to do double catch ups:
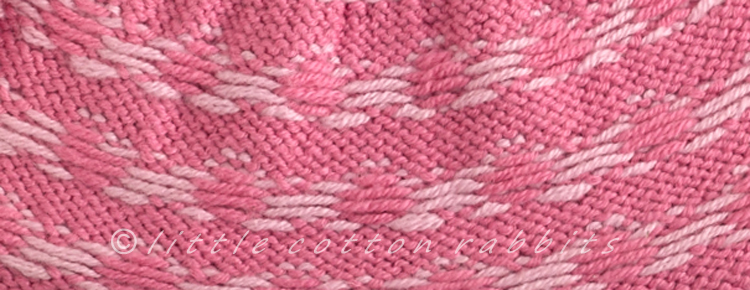
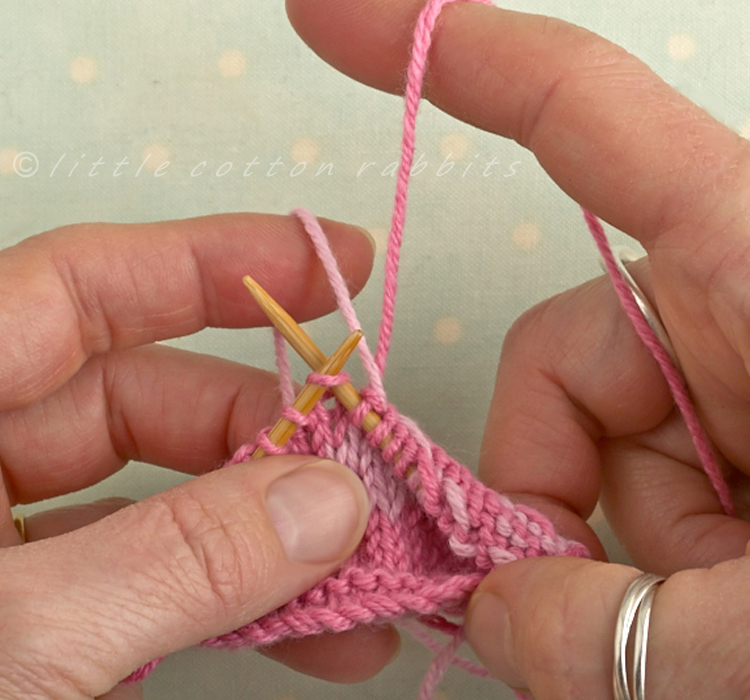
In this sample the darker pink is the main colour and the lighter pink is the accent colour.
Here I need to strand the accent yarn that I’m using for polka-dots across the back of 6 stitches of the main colour. Because it is the accent colour I am stranding it below the main colour (see above note on colour dominance). To catch up a long float first bring the accent colour from underneath the main colour.

Then work the next stitch with the main colour, so catching the un-worked accent yarn up with the loop between the stitches worked in the main colour. Then take the accent colour over the top of the main colour before working the next stitch, so catching the un-worked accent yarn a second time in a downwards direction.

At this point it is good practice to gently tighten the main colour stitch you’ve just worked as it can become a little loose with the extra yarn caught through it. It is important not to tighten the accent colour strand as this will cause the work to pucker and become uneven. Keep the strands of accent colour caught up at the back loose enough to stretch with the work.
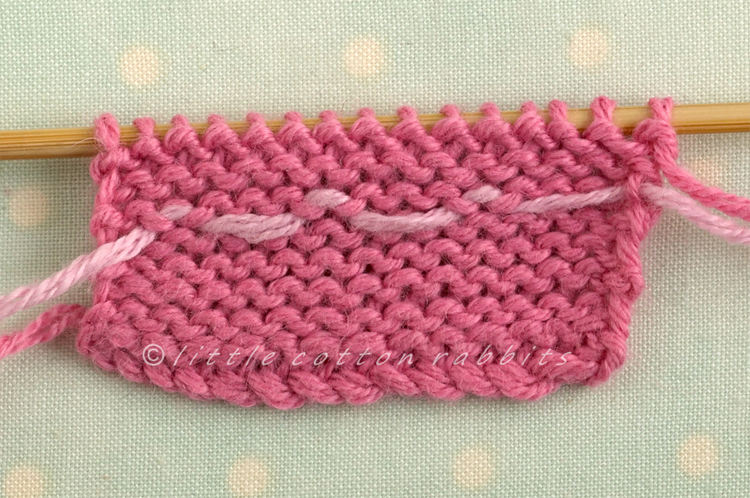
Here’s how it looks from the back. You can see the floats of accent yarn are caught up each time by two loops of the main colour yarn.

This technique can be used on both a knit or purl row.
Other rules that I always apply to fair-isle/stranded colourwork
- Try not to catch up your floats in exactly the same place on consecutive rows as this can lead to banding on the front of the work.
- Always take any strands of un-worked colours right to the end of each row and catch them up on the edge by twisting them with the yarn currently being used. If you don’t do this you will end up with gaps in your knitting where the stranded yarn pulls at the fabric.
- If you are working sections of a pattern that don’t include one of the colours, run this un-worked colour up the side of the work by twisting it with the main colour at the end of rows rather than cutting and re-attaching it each time it is needed.
- If you are mattress seaming your piece try to sew through the strands of both yarns when they are both present on the same row rather than just the main colour as this will give a much neater and more robust seam.
- You can mix different brands of yarn but stick to the same weight category and yarn composition – for instance don’t use a 4ply cotton yarn with a 4ply wool yarn as they will have different stretching properties.
These notes are not intended as an exhaustive guide but just a mention of the techniques that I like to use. A search on google or You Tube will give you many more tips and techniques if you want to know more.
If you have an aspect of knitting that you’d like me to write about in more detail please let me know and I’ll do my best to help.
Thanks x