Duplicate stitch (also known as Swiss darning) is a useful technique for adding a surface design onto an already knitted piece. It’s a stitch I use a lot especially on the front of bunny jumpers and some of the more complex dress designs.
It works well for any design that would normally use intarsia and there are some advantages that duplicate stitch has over intarsia:
- Using lots of colours: When you knit intarsia using any more than 3 colours it becomes very complicated (and tangled) but working a design in duplicate stitch means that you can incorporate many more colours. I’ve used up to 6 together on one design
- Unpicking: With duplicate stitch it’s easy to unpick the design completely if you don’t like it any more and your knitted piece is still intact once you remove the design. You can also unpick to any point if you realise you’ve made a mistake – just gently undo half a stitch at a time without pulling too hard so as not to pucker the earlier stitches. If you’ve knitted in intarsia the whole thing would have to be unpicked.
- Using different yarn types: When using duplicate stitch you can mix different yarn types which might cause problems with tension if used during intarsia knitting. For instance you could use a fluffy yarn to work an animal design. It is not recommended to use a yarn that is thinner (or substantially thicker) than the yarn used for the knitting.
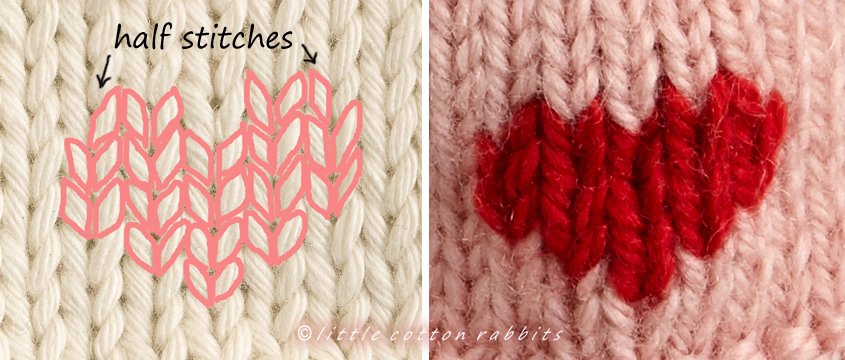
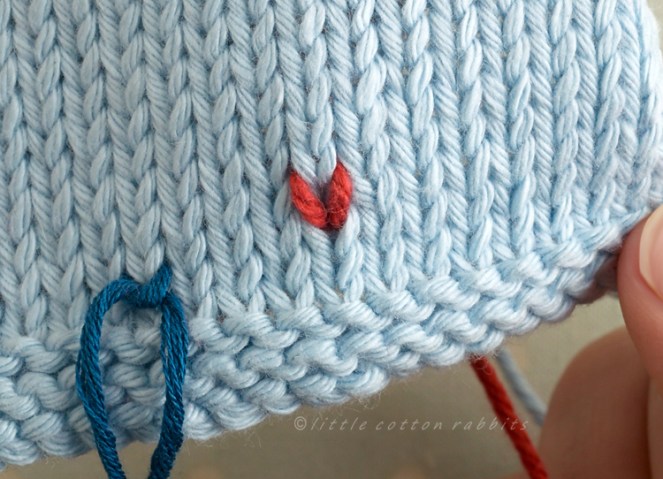
- Using duplicate stitch allows you to cheat a little by duplicate stitching just half a stitch. For instance in this little heart below I’ve added half a stitch at either end of the top row in order to smooth the curve of the top of the heart.
Before you start:
To block or not to block: It’s entirely up to you. You will find it easier to work duplicate stitch neatly if your piece of knitting that lies flat so if you’re unsure then best block first.
It is better to use a slightly blunt-nosed needle as a sharp needle can split stitches in the knitted fabric and make the whole process a bit more difficult.
Thread the needle with a long length of your chosen yarn. It’s good to choose a colour that contrasts well with the background colour of your knitted piece and the weight of the yarn needs to be at least equal to the weight used in the background knitting.
tip: if you are using a yarn that snaps easily (like a single ply yarn) then you may want to work with shorter lengths and join in new lengths regularly at the back of the work – I’ve found that the repeated sewing through the stitches can wear a weak yarn and cause it to snap.
Where to start:
Start from a bottom corner of your chosen design. I’ve found it much harder to get a neat finish if I am working downwards and threading the yarn behind an already duplicated stitch above – it never sits as neatly so I recommend always starting at the bottom of the design and working upwards.
I prefer to start from the bottom right corner but doesn’t matter if you start from the left or right of a design, so you choose what you’re most comfortable with.
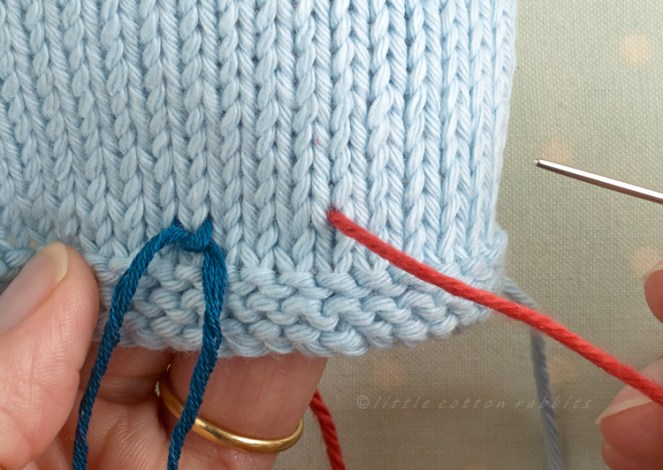
Find the centre point of your chart and mark the centre point of your knitting – this will make it easier to count out stitches so that you begin your design in the right place (here I’ve used a piece of blue thread to mark the centre stitch).

Here’s how:
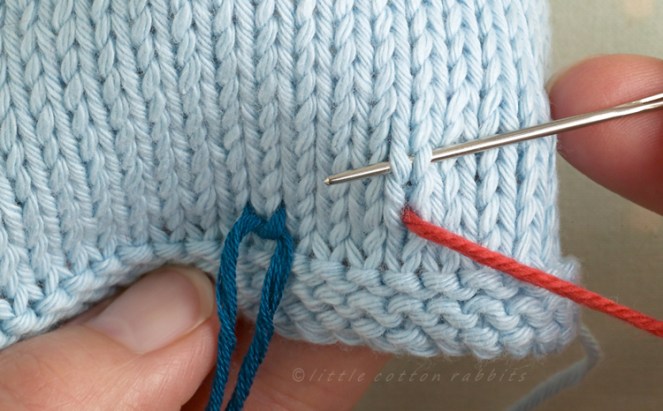
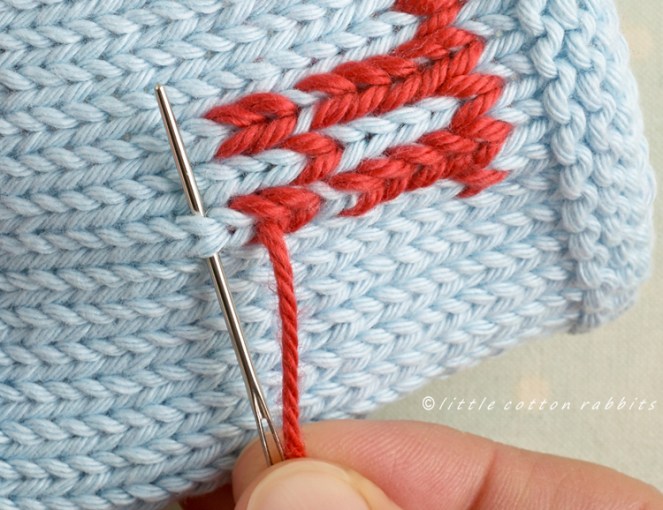
Thread your needle loaded with the length of yarn you’ve chosen for the design through your knitted piece from the back to the front by coming through the ‘V’ point of the first knit stitch that you want to duplicate…
Now from the front of the work slide the needle through both ‘arms’ of the stitch above, in the same direction as you are working in across the row (I always work the first row from right to left)…
And lastly take the needle back through the ‘V’ point of the stitch that you are duplicating from the front of the work to the back…
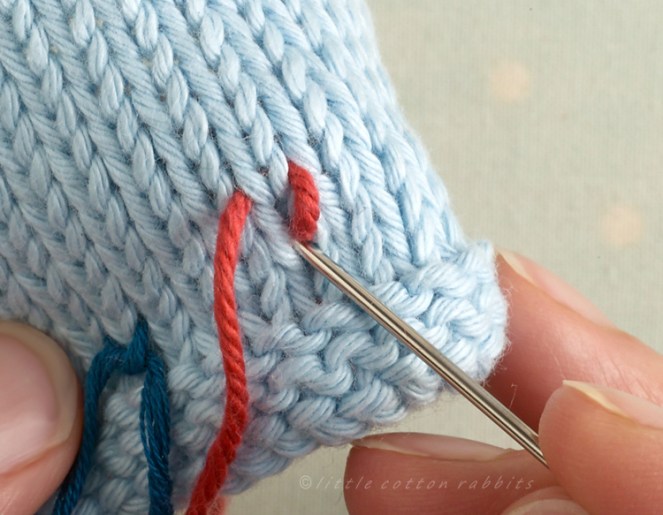
At this point check the tension of the duplicate yarn. Don’t pull it too tightly or the work will begin to pucker but don’t leave the duplicate yarn too baggy either – it needs to rest gently on top of the stitch being duplicated, hiding as much of it as possible.
That’s one stitch duplicated…
Work across the length of the row in the design that you are duplicating, repeating each step above for each stitch worked…
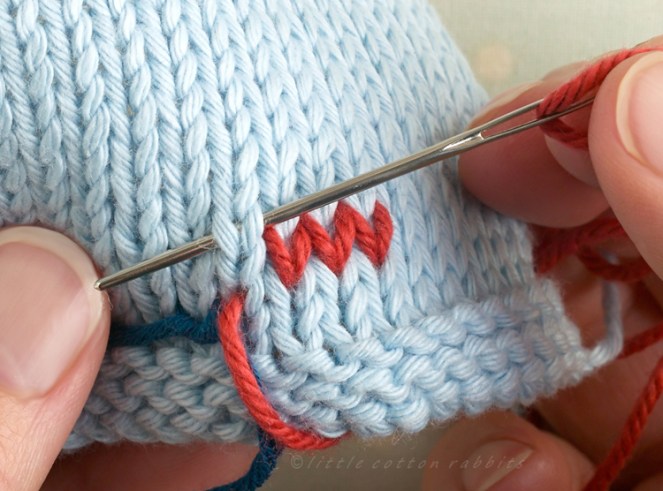
As you gain confidence with the technique you’ll find that you can work entirely from the front side of the work and just slide your needle tip across from the end of one duplicate stitch to the bottom ‘V’ start point of the next stitch…

Finish the row with your needle on the wrong side of the work.
To start the next row bring your needle from the back of the work to the front through the centre of the next stitch to be worked in the design. If this is more than 2 stitches away from the last worked stitch then you can weave in the yarn at the back of the work to avoid a long yarn float. I find it easier to turn the work on it’s side when I’m working from left to right back across a row…
Join in extra lengths of yarn where needed, either where you’ve run out of a colour, where a new colour is added or where there is a large gap between the areas in a design. You can knot ends together once you’ve finished and weave them in on the back of the design…

Finished duplicate stitched initial from the front…

I hope this helps a little. It’s the way that I work with this technique but if you’d like some other explanations you’ll find there are loads of tutorials and videos on the internet if you search ‘duplicate stitch‘
And if you’d like to use the alphabet charts to add an initial to your bunny sweater you can Download Alphabet chart.
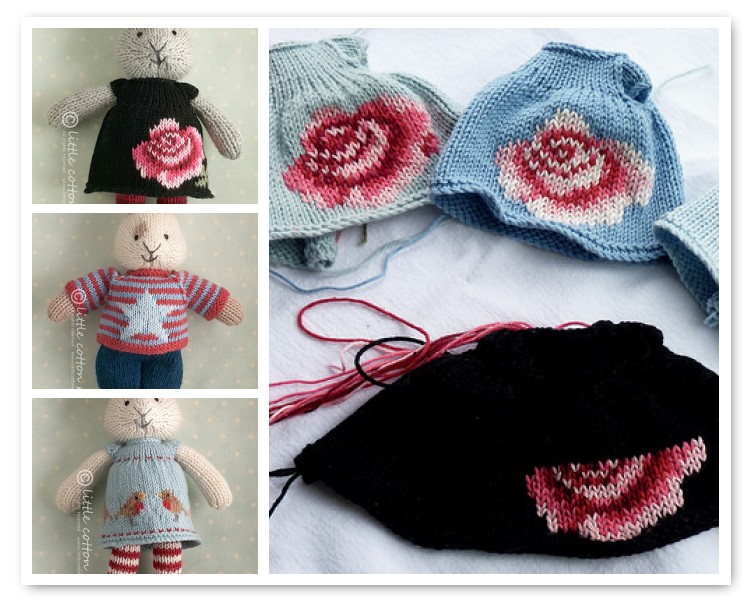
Here’s a chart for the rose that I have used before on some of the dresses for my animals (as pictured at the top of this post):
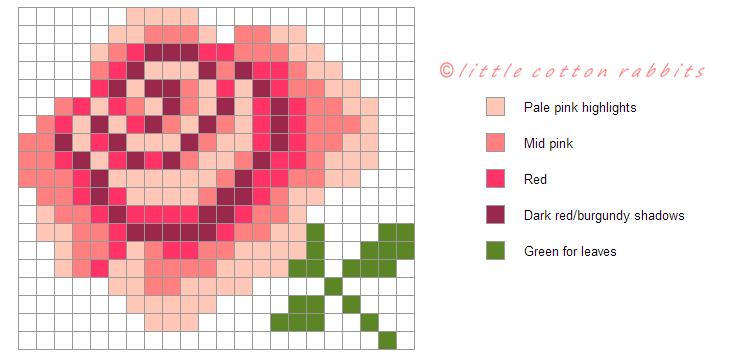
There are 4 colours used for the rose in order to create light and shadow within the petals. It can get very tangled on the back of the work so I tend to work one colour at a time. Tip: thread your tapestry needle with at least 1m/1yd of yarn and make your first stitch in the middle of the bottom row of a colour section, leaving half of the length of the yarn as a tail – then you can work upwards for the right-hand side of the design with that particular colour and then go back and pick up the long tail end to work the left-hand side. This allows you to use much longer strands of yarn and so creates less ends to sew in later on. Follow the tips for neat duplicate stitching as detailed above.
Happy stitching x

Thank you for sharing.
Greetings,
Juffrouw Mier
LikeLike
Again…you broaden my knitting, and finishing abilities. Thank you! Now to pull out my cross stitch patterns to see what might work for my bunny clothes! Endless possibilities without the tangle.
LikeLike
Wow 🙂 this is great idea 🙂 thanks for sharing, I have to try it 🙂
LikeLike
That’s a good letter to demonstrate! And another thing to learn. Thanks Julie. X
LikeLike
Thank you Julie!! 🙂
V x
LikeLike
I love the way you have worked the roses. They are beautiful and so much easier than knitting them in!
LikeLike
That is a wonderful technique, explained beautifully. Thankyou. I will try out a simple design on my next doll project. T x
LikeLike
Thanks Julie for the wonderful tutorial and hints on how to do duplicate stitch. Nobody could do it better than yoU! One more question and I may have missed it somewhere. Where can I find this GORGEOUS rose pattern? Love it so much!
LikeLike
Julie, this is fantastic! Duplicate stitch is one of those things I keep meaning to practice and of course your sweaters and dresses are the perfect opportunity. Thanks for this tutorial!
LikeLike
That rose is absolutely stunning! Thank you for the clear instructions.
LikeLike
What a wonderful tutorial, thank you so much for sharing and for taking the time to do this! I’ve only done a little duplicate stitch but this definitely makes me want to try it again.
S x
LikeLike
A beautiful and simple tutorial that I am earmarking for when I get some sweaters knitted up for the little ones come fall. 🙂
LikeLike
Brilliantly clear instructions! Thank you Julie!….then again, I wouldn’t expect anything less!!
LikeLike
My goodness! Your knitting is absolutely flawless! I’m in love with the embroidered rose pattern on the dress and I hope it’s available through your shop. Thanks for the tutorial. I made the dress with the robins and used the duplicate stitch as directed and it turned out great. Thanks!
LikeLike
That`s lovely and really helpful, thank you for sharing
LikeLike
It is very interesting to read how you do this and to know that is how you work some of your more detailed designs! xx
LikeLike
Many thanks. I have just finished knitting an elephant – named Caro (my sister is Carol) to be a friend for Little Mae (named after my late mother; both Caro and Little Mae are for my wee grand daughter in Melbourne and they can skype their friend Catie Pie who lives here in NZ with me.
LikeLike
You are a genius!!
Your bunnies are lovely.
Love them!
LikeLike
Muchas gracias.
Un saludo.
Olga
LikeLike
oh my that is quite brilliant!
LikeLike
Brilliant tutorial and such great photos. I’ve never done this but I have read some tutorials and it never actually got to my brain. I’ll bookmark this and can’t wait until my elephant is done so I can make her something extra special Thanks loads, Julie!
LikeLike
Fantastic and such clear instructions ☺
LikeLike
Completely brilliant and inspirational!,
LikeLike
Thanks for this! I have been thinking that I need to learn this. Great tutorial and pics are very helpful.
LikeLike
I’ve always failed with intarsia so I have bookmarked this tutorial. I had never thought about this method. Great photos and explanation too. Thank you!
LikeLike
That has come at just the right time for me – thank you for giving a simple clear explanation for something I have been struggling with over the past! Thanks for the letter chart too, I think I will be needing that soon as well.
LikeLike
I am working my way through Nikki Trench’s fair isle & nordic knits and this is one area that wasn’t explained in any detail in the book. I am fascinated with fair isle knitting and thanks to your tutorial I can add pattern with even more confidence. Can you let me know if this technique works equally well with wool (your yarn looks like a cotton blend?)Once again many thanks for a great tutorial, I know they must be very time consuming! Jx
LikeLike
Such a pretty rose and such a good tutorial! I’m Swiss but I didn’t know the stitch as such 😉
Thank you for your lovely blog!
Lena
LikeLike
It works very well with wool, as fuzzier yarns help to hide the stitch below even better than tightly plied cottons.
LikeLike
I’ve not shared the rose chart yet – it’s still a work in progress that I keep tweaking each time I make one. Once I’m happy with it I’ll write it up to share x
LikeLike
Thank you for sharing. It’s a great tutorial!
Quel délice que votre blog!!!! ♡♡♡
Lucie x
LikeLike
Thanks so much for sharing this. I loved your previous post on the seasonal bunny sweaters and I was wondering to myself if it was possible to “embroider” a design onto a sweater, as my knitting skills are VERY basic and fair isle/intarsia is way out of my league. So now I know, thanks to your wonderful tutorial! Best Wishes, Bea.
LikeLike
I’m working on a project that this might work well for. There is a tiger face and an “S” for school spirit socks I’m knitting for my nephew.
LikeLike
You are so talented! Thanks for the tutorial.
LikeLike
Thanks so much! LOVE your blog!!!
LikeLike
It looks so great.
I am going to try it with my own designs. Thank you for the tutorial.
Miss.
LikeLike
thanks for sharing and demo,i am ging to have a go could not do this last time you said i love the watering can, handel idea so good you are so clever .
LikeLike
sorry about above,handle,going type to fast
LikeLike
Wow…you make it look so easy.
Im sure I could have a go at duplicate stitch now. Thank you so much.
LikeLike
Danke für diese Anleitung,liebe Grüße
LikeLike
CAN YOU PLEASE PLEASE SHARE ROSE PATTERN XX
LikeLike
Any plans to share the rose chart soon? would love to make this dress as a Xmas gift this year!
LikeLike
Thank you Julie,I have never tried this. Once again your lessons are so easy to follow. New Zealand.
LikeLike
I am somewhat new to knitting and this tutorial was very helpful. I have found a chart I would like to turn into a bookmark. How do I know if I have made the piece big enough?
LikeLike
Thank you for sharing 💜
LikeLike
Thank you for sharing❤
LikeLike
I just have to tell you this tutorial was a game changer for me! I’ve always struggled with duplicate stitch and avoided it when possible but I used it on my project and I’m thrilled with the results. I couldn’t be happier thank you soooo much!
LikeLike
What dress pattern and size was used for this duplicate rose dress. Thanks
LikeLike
Always inspiring me !!
LikeLike