Thanks so much for the lovely welcome back. Things here are settling nicely back into a manageable routine and although Toby isn’t yet calm and content he’s definitely changed his mood for the better.
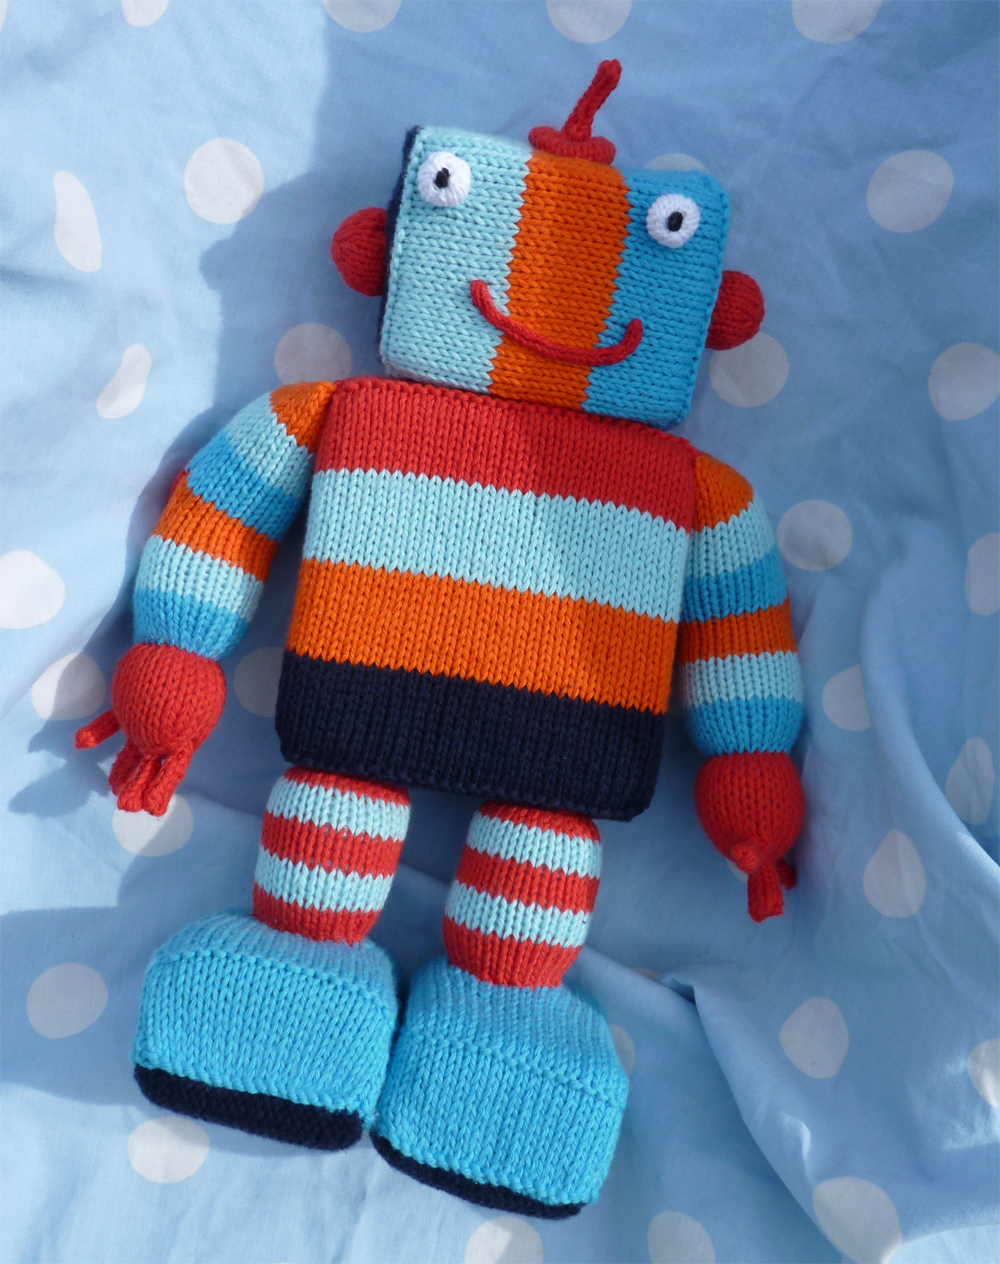
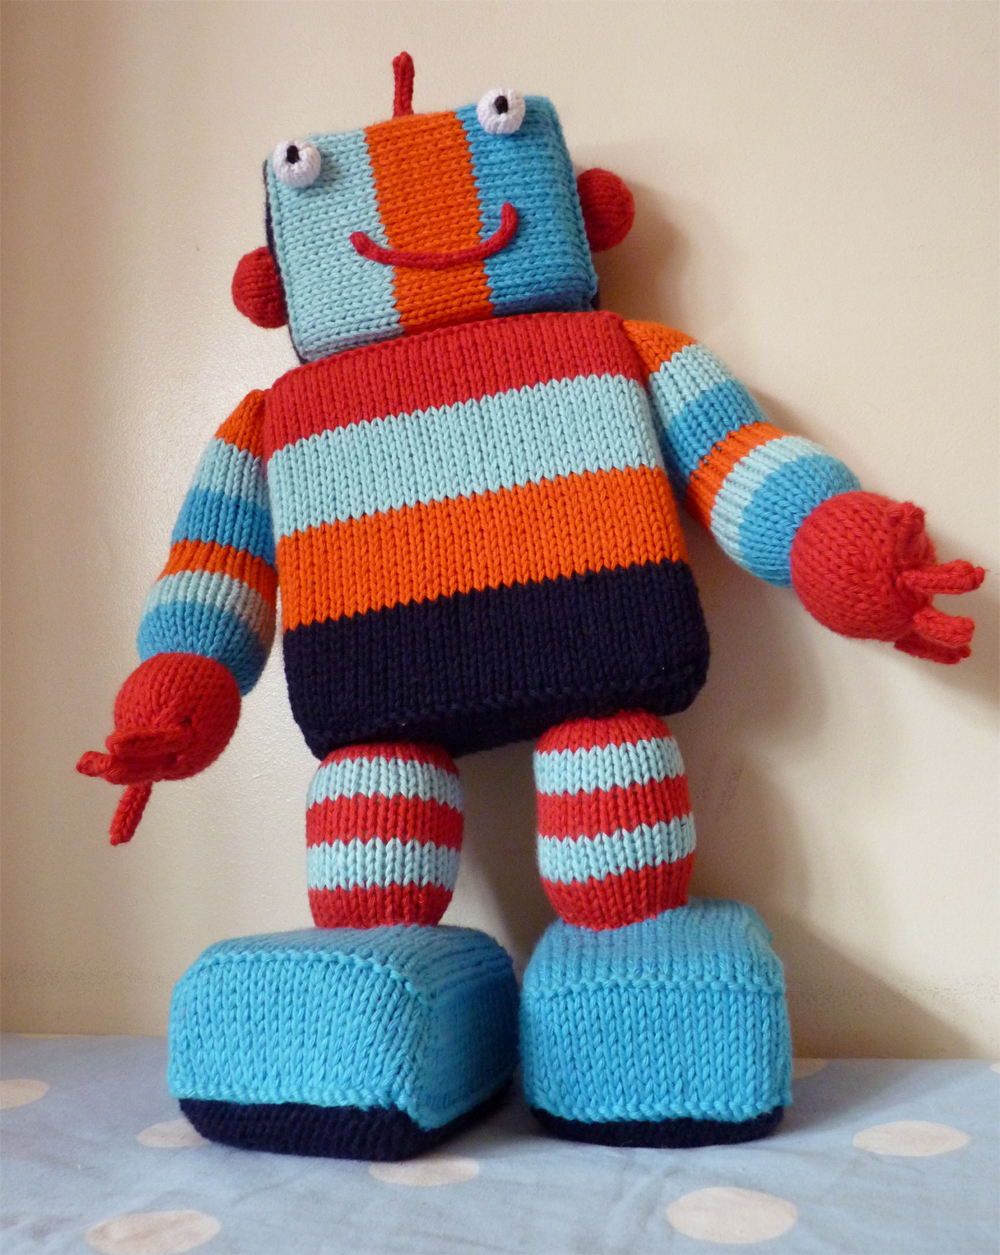
I’ve really enjoyed picking up the needles again and have finished off Mr Ro-bot who has been delivered to the reception class teacher at school in time to meet this year’s new children. I love the thought that he’ll be a friendly helper in their learning.

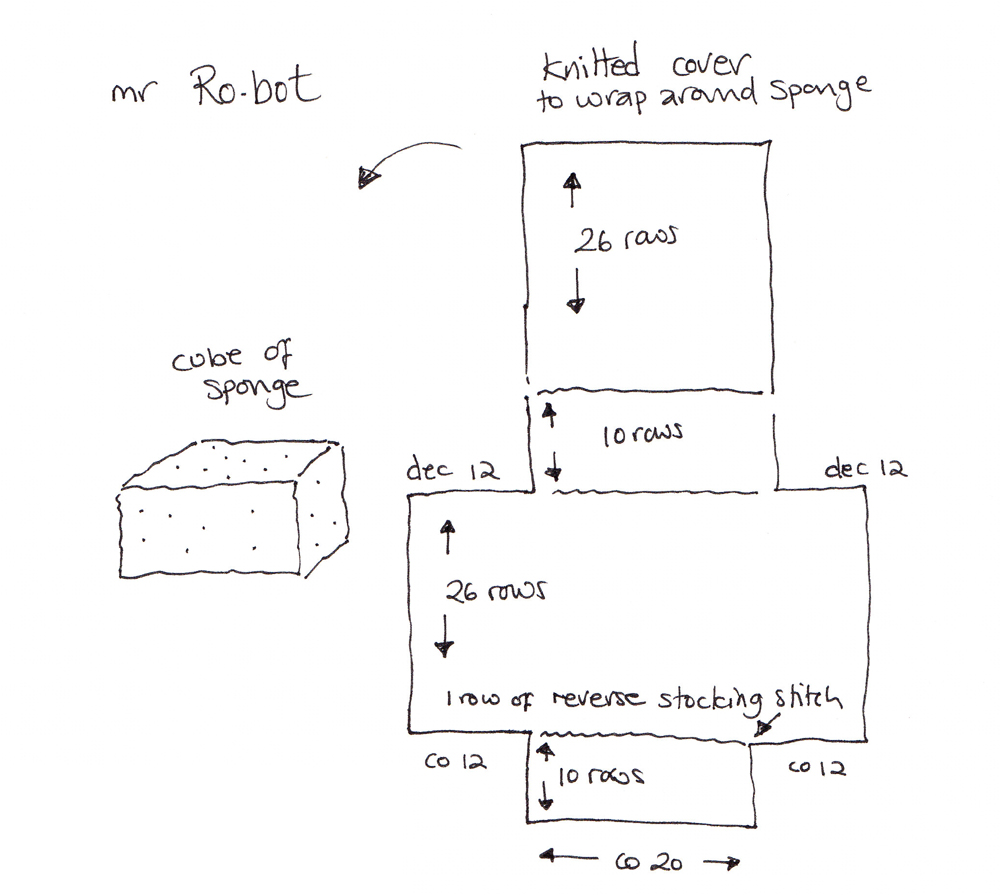
At the moment I’m not going to write up a full pattern for him but I’ll run you through how I made him. I used 5 different shades of Rico Creative Cotton and 3.5mm needles and I do have some of each shade left over so 5 balls is plenty. I used 2 decorator / car wash sponges which were approx 13 x 20cms and 5cms deep. I chopped one sponge in half and used 1 half for the head while the other half I cut in half again to make 2 feet. I trimmed the second sponge for his body. I have this sketch which shows how I constructed the blocks (these measurements were for the feet and the head and body were larger).
For the legs I cast on 28 stitches and worked 20 rows alternating between 4 rows of 2 separate colours. I sewed the back seam up to make a tube and then sewed this to the top of the foot before stuffing it firmly and then sewing it to the finished body. The arms were just my knitted christmas stocking pattern with more rows at the end to form the hand. I ran a length of thread through the back of the knitting at the wrist to gather it in and tied it off after stuffing the hand before finishing sewing up and stuffing the arm. The fingers were i-cords of 3 stitches and 8 rows.

The ‘ears’ are knitted in the round – starting off with 20 stitches and over several rows decreasing until 8 remained then gathering the remainder to make a sort of bobble and stuffing them before sewing them to the sides of the head. I did the same with the antennae but carried on until 3 stitches remained and then did a short i-cord. I didn’t stuff the bobble but squashed it flat and sewed it in place. The eyes are knitted bobbles in white 4 ply yarn and the smile is a 6 cm i-cord in 4ply yarn and 2.5mm needles sewn on.
If you wanted to make a similar robot of your own I’d start by cutting your cubes of sponge up first. Then cast on as many stitches as you think you’ll need and match your knitting to fit – that’s what I did but I didn’t keep decent notes. I do remember that I put a reverse stocking stitch to mark the corners as this gives the knitted fabric a natural right angle bend.
If I get the chance to make another one in future I’ll keep better notes and try to write up a proper pattern to share.

Oh, he’s lovely!
LikeLike
Mr Ro-Bot is brilliant! I’m sure he’ll be loved by many!
Glad things are settling for you. 🙂
Vivienne x
LikeLike
Mr. Ro-Bot is so cute. I know the children will love his bright colors and cheerful face. You are so clever. Thanks for sharing!
LikeLike
He’s wonderful I’m sure the children in nursery will enjoy seeing his welcoming cheery face.
LikeLike
What a cute guy! I have to knit one for my son.
LikeLike
Hello Julie…just caught up today..great to see you back! The Sleep-Out looked tremendous fun, and I could smell the bacon! Love Mr. Ro-Bot and his cheery smile…. Hope Toby continues more cheerful and you find peaceful moments over the Autumn days…it’s gorgeous here in Cheshire today. We’ve five young goldfinches on the front garden feeder. They’ve managed to steal a delightful hour of our time as we watched them defending “their” feeder against other feathery incomers! Back to work now! Love to you all…Jenni xx
LikeLike
Ingenious use of car sponges! Good to see you back.
Sorry to hear that your summer didn’t run as smoothly as I’m sure you would’ve liked but it’s good that you got some lovely moments out of the school holidays. Your back garden camp-out looked great fun.
Wishing you (and Mr Ro-bot!) a happy week x
LikeLike
He’s terrific. Glad things are settling down a bit now.
LikeLike
Hi Julie,
Mr Ro-bot is brilliant, so colourful. Those lucky children.I just love your patterns. Did you ever do a pattern for a mole??
Love Carole from Rossendale xxxxx
LikeLike
He is wonderful Julie. So colourful, i’m sure the kids will love him. Glad Toby is settling a wee bit.xx
LikeLike
hahaha! I LOVE Mr Ro-Bot!! What a fab idea…going to live at school to help the kids learn! :o)
Glad the “mood” is changing for Toby too….
Have a good day lovely ;o)
hugs
hello gorgeous xxx
LikeLike
fantastic!
LikeLike
I absolutely love this little guy! You are beyond brilliant! Thanks so much for posting your notes. I’m glad things are settling back down for you.
LikeLike
He is fabulous. What lucky kids!
LikeLike
He’s absolutely brilliant and picture perfect. What fun!
LikeLike
He’s just too darn cute!
LikeLike
I love him!!!!
LikeLike
Good idea to use kitchen sponges for the stuffing. I always thought if I wanted to use blocks for stuffing that I’d have to find somewhere that sold blocks for stuffing.
And he is very cute!
LikeLike
Ack he’s so cute! Can’t wait to make one!
LikeLike
I wish my daughter who started reception last week had someone as gorgeous as Mr Ro-bot to help her settle in – he is lovely!
LikeLike
He’s super.. those lucky reception children will love him for sure. Fingers crossed that Toby’s mood continues to improve.
LikeLike
Glad to hear you home is a little calmer for you all. Wow that knitted robot it just stunning! He looks full of life!
LikeLike
Wow Julie – Great Mr Ro-bot. The only problem I foresee is a rush of orders for more in different colours!!! And that looks like a pretty good set of instructions to me!!! I do hope Toby is gradually getting settled into some sort of routine and am so sorry the summer did not turn out as you had hoped. Love your tent and bet you and Amy had a great time. Hope you are able to find time for a cup of tea and some knitting when the sun decides to shine. JennyH.
LikeLike
He’s adorable! He’ll get so much love. Glad Toby is settling in a little more. Poor guy, and poor family!
Have a wonderful day.
LikeLike
He is so incredibly cute! The colors you used are great, very fun and cheerful!
LikeLike
Just like I said – Superwoman!
Davina xx
LikeLike
Too cool!
LikeLike
Eeeeek! He’s just too cute. What a fun little helper for all the children to see everyday!
LikeLike
I want, I want, I want, I want!!!!!!
LikeLike
Hopped on over to your blog today just in time to see you’re back! Happy Fall!
LikeLike
The thing is, everything you do is so neatly done. Perfect. Nothing in my life is that way, which is why I love looking at your work.
LikeLike
I just love your Robot. I check your site every week to see what you are up to. You have such a wonderful sense of style. You have inspired me.
LikeLike
God to see you back. Make the most of the time to relax. I forsee many robot conversations with reception children. Wish I could be a fly on the wall to hear them. x
LikeLike
He is really lovely I bet the kids thought he was Fabulous!!
LikeLike
He’s terrific – I bet the kids will love him too! Nice that, because he’s not cutesy, he’ll appeal to the boys. Sounds like you’ve had some challenges this summer, I hope things continue to settle down.
LikeLike
Oh wow Julie, he’s fab! He’s going to be such a hit with the children.
Lovely :o)
xxx
LikeLike
How very charming–and those little fingers!Your work is past excellent–no wonder it brings you joy. paxami
LikeLike
He really is totally fabulous! You’ll have to make sure the Reception teacher lets the children play with him too! Lucy x
LikeLike
Oh he’s fantastic! And so happy to hear everyone is settling back in to the school routine. K x
LikeLike
Ah he’s brilliant!! You’re so imaginative, I’m sure the kids will love him!!
LikeLike
Oh, he’s just way too cute! I can hear the childrens’ giggles across the ocean!
LikeLike
Brilliant & so much fun.
LikeLike
He’s absolutely wonderful! I would love to try to make one of my own.
LikeLike
You are incredibly talented! That is a gift from God and so nice to see how much love and thought you put into everything you make.
LikeLike
what a fabulous robot!
LikeLike
He’s fabulous – and so cute! Can’t wait for the pattern!
LikeLike
He is so cute – the kids are very lucky. Hope you have some nice ‘me’ time now yours are back at school.
Take care
LikeLike
Oh my goodness! He’s so cute!
LikeLike
He’s so cute! You amaze me with all that talent!
LikeLike
Adorable… goes without saying! Love everything about it… from color choices to face to itty bitty fingers. Thanks for sharing. I’ll be linking on Facebook.
LikeLike
Magnific!!! very cute!
LikeLike
He’s gorgeous, such a clever idea.
LikeLike
How much would this be to order? Love him
LikeLike
Thanks for the fabulous pattern – I’ve just made a customised version for our ‘phonics robot’ for our pre-school classroom. Just need a good name for him… looks like a R-O-N to me… xx
LikeLike
Hi my name is Karen i would like the mr ro bot Patten
LikeLike