Seaming. You either love it or hate it. Personally I’m a lover of seams, especially mattress stitch because it gives such a professional finish, so I thought I’d write a little about the benefits of using a mattress stitch seam and how best to work it on different knitted surfaces.
Granted, there are times when a seam is not always appropriate. Socks for instance are definitely better without seams but when it comes to toy knitting I’m a firm believer in seams as an integral part of shaping the finished toy.
It seems that for some seams are dreaded and actively disliked and perhaps the main reason is because seaming takes longer and after you’ve finished knitting something you don’t want to spend ages finishing it off. However, I suspect that there are some who don’t like seaming because they are never happy with the results. To those people I’d like to offer the following few little tips from my experiences and a few words of encouragement; you can do it, keep at it because practice really does make for perfect seams…
So what is mattress stitch?
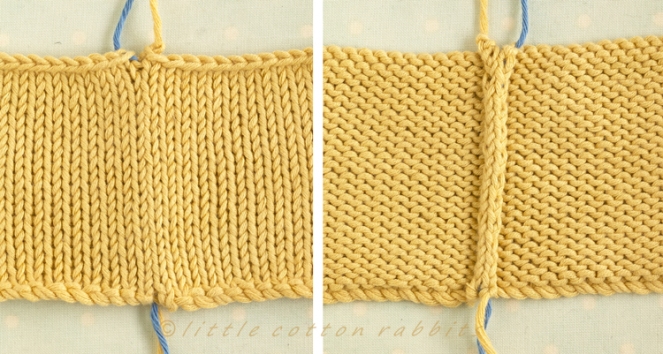
It’s a way of joining a vertical seam with a virtually invisible look on the front of the work, on the reverse there will be a raised selvedge, see here the front and back of a mattress seam:
The principles of mattress stitch are very simple, you work in the direction that the piece was knitted in and join the pieces together with right sides facing you, by sewing through one bar between stitches on one side of a seam and then a corresponding bar on the opposite side of the seam. When I say ‘bar between stitches’ this is what I mean:
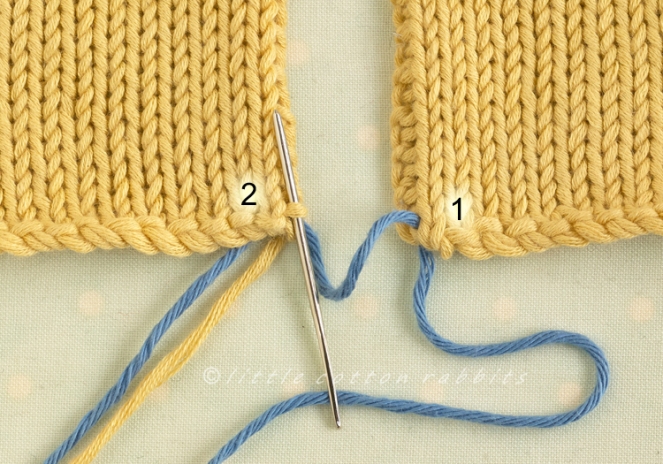
In the picture below you can see I have numbered the 3 columns of stitches nearest to the edge of the work. Each single stitch makes a neat V shape with each row of stitches sitting neatly in the V of the stitch in the row below to create columns. Between every column of V shaped stitches there are horizontal bars running from the back of one stitch to the next (on the reverse of the work this is seen as a purl bump). These ‘bars’ between stitches are what you want to be sewing through when you work mattress stitch, it’s commonly referred to as a ‘channel between stitches’ and the best channel to use is the one between stitch 1 (which is right on the edge of the work) and stitch 2, as shown here. Some people seam through 2 bars each time, now if you have a very long length to join this is probably a good choice but as all my patterns deal with small pieces I always seam through a single bar as I feel it gives a neater seam on most knitted fabrics.

What to sew with:
Before you begin, it’s best to consider what you are going to sew your seam with and whether you are going to use the cast on tail end from the knitted piece or use a new length of yarn.
Usually I begin seaming with the cast on tail from the work (all of my patterns give instruction to leave a certain length of yarn when you cast on) but sometimes there are reasons why you might not want to do this:
- the tail end you’ve left is too short
- the yarn is not strong enough *
- the yarn is expensive and you don’t want to use it up on a seam.
In these instances you would cut a length of alternative yarn to seam with. This could either be a length of the same yarn your piece is knitted in or one of a similar colour.
*Going back briefly to point 2 above. If you have knitted in a single ply yarn or a softly plied wool you might find that the yarn breaks too easily to be used to sew a seam. I love knitting animals in Malabrigo worsted which is a single ply yarn but I’ve often found that half way up a seam the yarn just comes apart and then you have to unpick the seam and start again. You can strengthen any weak yarn by giving it extra twist. Do this by simply threading the needle with the tail end and twisting in the same direction as the yarn is plied until the yarn curls on itself. This will now be a much stronger yarn to seam with:

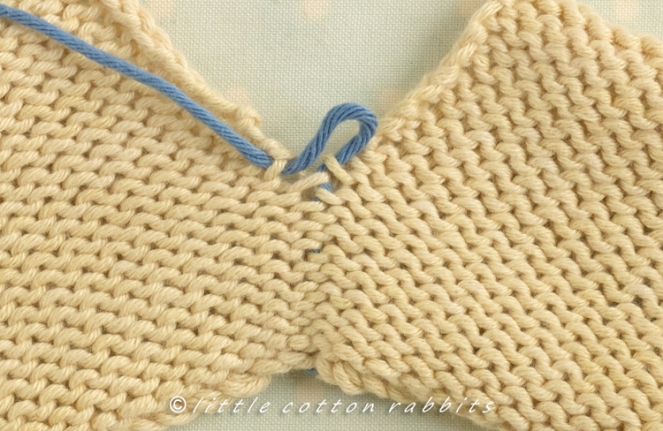
So back to seaming. Whether you use the cast on tail or a new length of yarn you need to begin by anchoring the bottom of the seam.
Anchoring the seam:
I always lead with piece on the right hand side of the seam, it seems to give a neater finish (but that could just be because I am right-handed), so here’s how to set up so your first seam stitch is on the right hand side of the seam…
Assuming you are starting with the tail from the left hand piece:
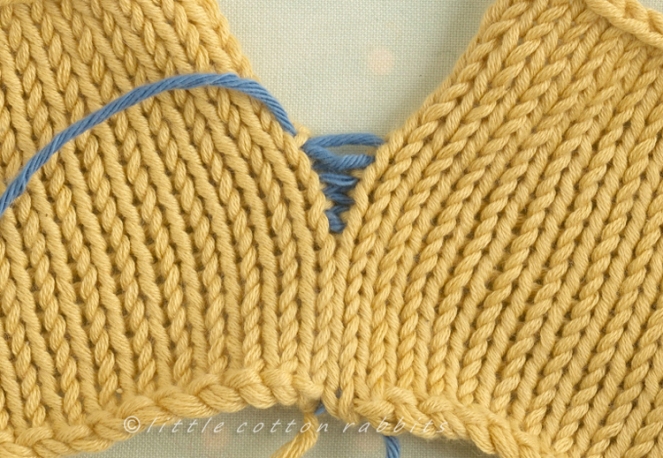
1, take the yarn across to the right hand piece and sew downwards through a stitch on the cast on edge;
2, now sew upwards through the corresponding stitch on the left hand piece.
If your tail end is on the right hand piece just follow step 2 above.
Now you are ready to start the seam with the first stitch on the right hand of the seam and below are instructions for seaming 4 different surfaces:
1. Seaming smooth stocking stitch:
Making sure that you are working into the very first bar above the cast on edge, slide the tip of your needle through the bar between the first and second stitches…

(note: I’ve used blue yarn as the working yarn here simply for contrast so you can see more clearly, in reality it’s best to use colour as similar to the work as possible)
… then slide the needle through the corresponding bar on the left hand piece

Keep working up along the length of the seam, alternating between the right hand side and the left. At this point it does not matter if the stitches are loose (see below).
Every inch or so you can pull gently on the working yarn to tighten then and draw the sides of the seam neatly together…

Unless otherwise instructed don’t pull too tightly or the seam will pucker and become rigid (sometimes this will be useful depending on what you are seaming). If you find you have pulled too tightly you can gently lengthen the seam again, as mattress stitch forms a very fluid seam which will compress or stretch as required until you’ve tied it off at the end.
Once you have completely joined the sides it’s best to tie off the end you’ve sewn with (to the cast off tail from the knitted piece) in order to anchor the seam. Then weave in the ends (I usually weave them in along the seam selvedge although bear in mind that depending on the yarn you’ve used this can make the seam a little bulkier).
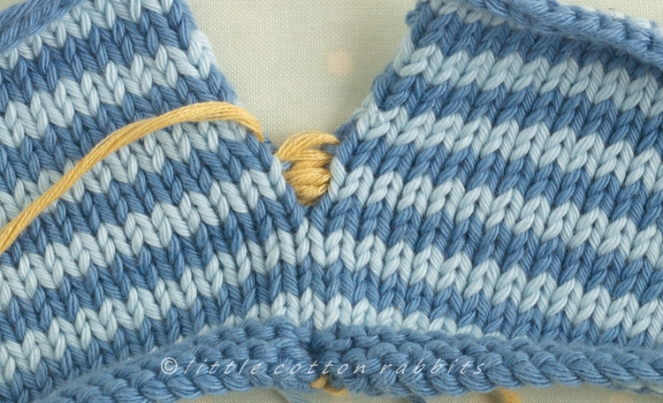
2. Seaming stripes on stocking stitch:
Seaming stripes follows exactly the same process as above. The main issue is making sure that the stripes line up nicely. I find that leading with the right hand side gives the neatest alignment, so just make sure that you are sewing the first stitch of a new colour section through the right hand side before the left.

3. Seaming reverse stocking stitch:
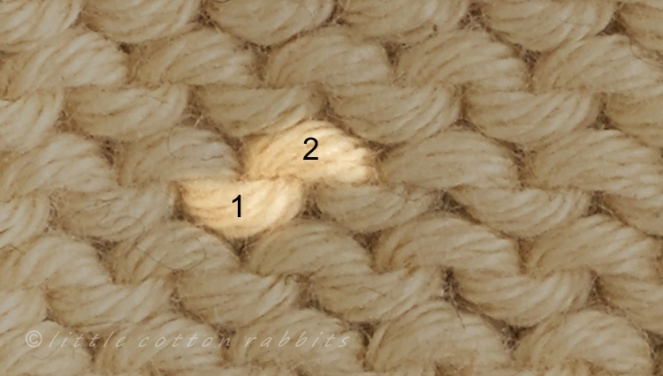
This is a little more complicated, but only because on one side of the seam you want to sew through the top part of a stitch and on the opposite side you’ll need to sew through the lower part. I’ve heard these referred to as ‘frowns’ and ‘smiles’, ‘mountains’ and ‘valleys’, ‘uppers’ and ‘downers’ and so on, you get the idea. Here’s a picture to show what I mean: 1 is a lower bar (smile, valley, u, etc.) and 2 is an upper bar (mountain, frown, n etc)
In order to seam reverse stocking stitch all you need to do is be consistent. I tend to use the lower bar for the right hand side of the seam and the upper bar for the left hand side but it doesn’t matter which side you chose as the ‘upper’ and which as the ‘lower’, all that matters is that you are consistent once you have chosen.
Begin as above by anchoring the start of the seam and then beginning with the right hand side slide the tip of the needle through the first lower bar…

and then on the left side slide the tip through the corresponding row upper bar…
Work the length of the seam, alternating between the right hand side and the left. At this point it does not matter if the stitches are loose (see below).
Every inch or so you can pull gently on the working yarn to tighten then and draw the sides of the seam neatly together…

Unless otherwise instructed don’t pull too tightly or the seam will pucker and become rigid (sometimes this will be useful depending on what you are seaming). If you find you have pulled too tightly you can gently lengthen the seam again, as mattress stitch forms a very fluid seam which will compress or stretch as required until you’ve tied it off at the end.
Once you have completely joined the sides it’s best to tie off the end you’ve sewn with (to the cast off end from the piece) in order to anchor the seam and then weave in the ends (I usually weave them in along the seam selvedge although bear in mind that depending on the yarn you’ve used this can make the seam a little bulkier).
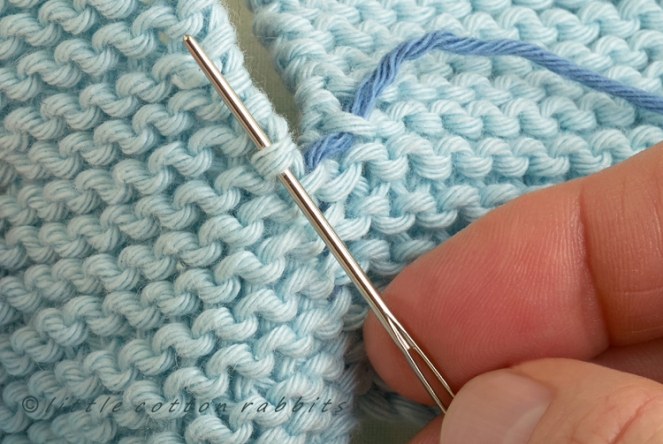
4. Seaming garter stitch:
In garter stitch every row is knitted, forming distinct purl ridges across the fabric. When seaming garter stitch I don’t sew through the stitches on every row. Instead I ignore the bars on alternate ‘smooth’ rows and just sew through stitches on the ‘bumpy’ rows. I’ve found this gives a much neater seam. Here’s a seam joined by sewing through a stitch from every row (both purl bumps on one row and smooth bars on the following row), it looks messy to me:

And here’s a seam sewn by just using the stitches from the alternate ‘bumpy’ rows, which I think looks neater:

Simply use the same principles as for seaming reverse stocking stitch by sewing through upper bars on one side of the seam and lower bars on the other. Here I’ve sewn through the lower bar on the right hand side…
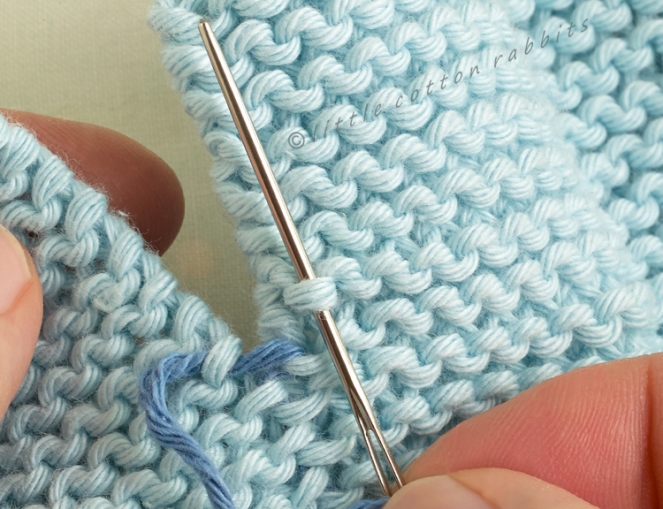
And the upper bar on the left-hand side…
Unless otherwise instructed don’t pull too tightly or the seam will pucker and become rigid (sometimes this will be useful depending on what you are seaming). If you find you have pulled too tightly you can gently lengthen the seam again, as mattress stitch forms a very fluid seam which will compress or stretch as required until you’ve tied it off at the end.
Once you have completely joined the sides it’s best to tie off the end you’ve sewn with (to the cast off end from the piece) in order to anchor the seam and then weave in the ends (I usually weave them in along the seam selvedge although bear in mind that depending on the yarn you’ve used this can make the seam a little bulkier).
Remedying possible problems:
Jumping channels:
Sometimes if your mind is wandering you can accidentally jump across channels between stitches. This will be very evident on the front of the work, here there is a noticeable step on the left hand side of the seam (see where the arrow is pointing to). It’s easy to fix this by unpicking the work to the point just beneath the jump, see ‘Unpicking in the event of a mistake’ below.

Out of alignment stripes/colour work:
When sewing stripes it’s obviously important that they line up. Again I find that leading with the right hand side usually gives the best result. If you find you’ve missed a loop or your stripes are not aligned then it’s best to pull out the seam and start again (see ‘unpicking in the event of a mistake’ below).

Sewing in the wrong channel between stitches (not making a neat V):
Sometimes you may accidentally sew through the bar in the centre V of a stitch instead of the bar between two stitches. This is what that seam will look like. You can see that the stitches immediately on the left of the seam are lying in the same direction as those on the right of the seam rather than mirroring them, so it looks like the central row of stitches has two left hand arms. It’s a neat seam but not invisible and to correct this you’ll need to unpick the seam and start it again (see ‘unpicking in the event of a mistake’ below).

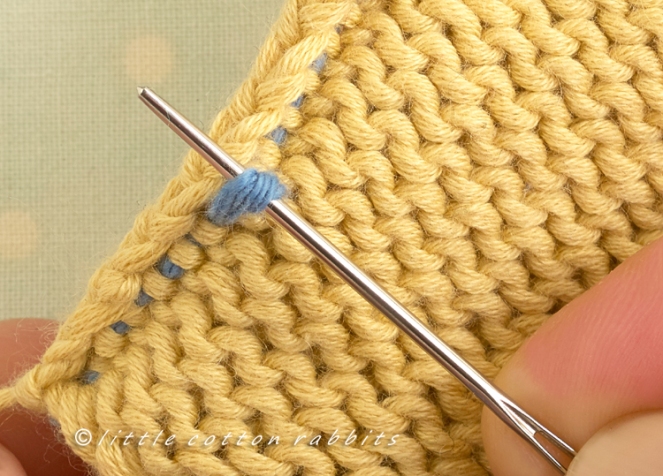
Unpicking in the event of a mistake:
One of the nice things about a mattress stitch seam is the ease with which it can be undone.
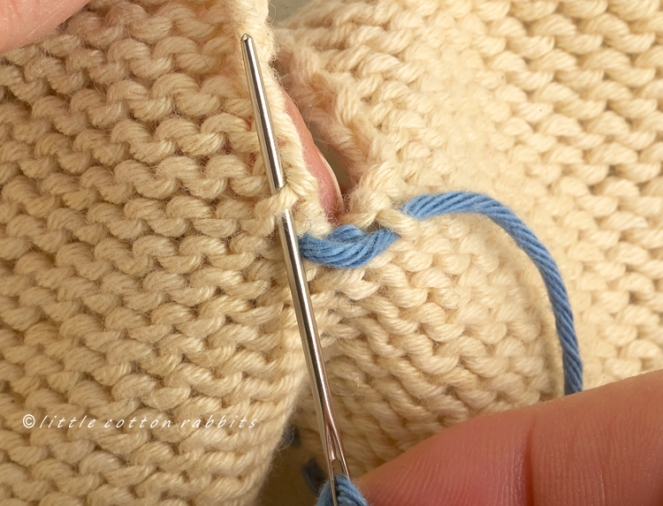
If you turn the work so that the wrong side is facing you’ll see the selvedge seam. Bending that over you’ll be able to see a little line of straight stitches running down the length of the seam these are the back of the mattress stitches (here I’ve used blue thread for contrast). Simply find the point that you need to unpick to and slide the tip of the needle underneath the stitch at that point and pull the working thread gently all the way through so unravelling all of the mattress stitches above that point. Then just re-thread your needle and continue seaming.
Well, that’s it. I hope you find some of these tips useful and enjoy using them to finish your knitted projects neatly and professionally. If you have any questions ask away in the comments below and I’ll do my best to answer them and if you have anything else you’d like me to cover in a future tutorial please let me know.
happy knitting and seaming 🙂
You can find my other tutorials here

THANK YOU SO MUCH!!! These are great tutorials that I will refer to often.
Thank you! This is a fabulous reference…you’ve made it so easy to ‘see’ what to do for each type of stitch.
Thank you, this is a great help!!
Great tutorial!! So useful!!! 😉
Thanks so much for your tutorial, I’ll definitely be coming back to this post when I next need to sew something together, my least favourite part of the little knitting that I do. I’m much more at home with crochet and could quite happily join pieces together all day long but find sewing knitting together really difficult so hopefully your tips will sort me out!
Thank you for taking the time to do this – doing the “mistake” ones must have made you gulp a few times 🙂 those pictures look really helpful – I have all the pieces for one of your rabbits sitting waiting to be sewn up…now there’s no excuse!
Wow! Thank you Julie very much! We will wait u with news patterns 😊 Awesome 👏🏻
Very informative Julie…thank you! I love mattress stitch, its like magic.
Lovely to hear from you. 🙂
V x
Thank you for the wonderful photos and explanations above. Extremely helpful. Very nicely done!!!
Well done again…Thank you! Might I request a tutorial on short rows/wrap and turn please?
Thank you so much Julie, thank you for your time to do this, it is one big job.
Very informative, will definitely safe it for future reference.
Christa.
Thank you! Excellent tutorial for seams – I really needed the tutorial for reverse stockinette a few years ago.
Wonderful clear tutorial on seaming! Many thanks, Julie! I’m looking forward to the new patterns too.
Incroyable !
Je ne comprends pas tout le texte mais vos photos sont très explicites. Vos créations sont superbes et d’une grande finesse !
Merci, portez-vous bien.
Thank you for your tutorials. We perform different edge if we knit the last stitch or we skip it. What is the best technic? Can we knit the last and the first stiches? I use the following method: I skip the last stich -only yarn over and I knit the first stitch in the next row with K. But if I knit the whole role, I perform different edge, and it is complicate to follow the seaming. And what can we do with the toys? Is the last stich of the row skipped? Thank you and I enjoy your pattern!!! -Adri from Hungary
Hi Julie,
Could you do an update of this tutorial on how to catch floats on purl rows in Flat knitting? I’m having a harder time finding a good tutorial.
Thanks
Alicia
Merci pour ce tutoriel. J’en ai vraiment besoin. J’ai fait deux petits lapins mais mes assemblages ne sont pas très jolis. Des tricoteuses m’ont dit de ne pas tricoter la première et la dernière maille de chaque rang. Est ce cela ? Je suis débutante en tricot et je commence avec vous et en anglais, ce n’est pas facile mais j’aime trop ce que vous faites. Merci et très belle journée. Muriel
Merci beaucoup pour ce tutoriel très détaillé.. Les photos sont explicitent et vont bien m’aider car je ne maîtrise pas encore très bien le tricot en anglais, oups
Mon nom de famille est Renard et j’ai donc craqué surtout pour vos petits renards!
Bien sincèrement
Véronique
Thanks Julie, you have explained this so clearly. I will refer to it often.
Sue
Julie this is a ‘perfect’ tutorial, thank you so much! Samples are so neat, photos really clear and instructions easy to follow. Definitely to be bookmarked and referred to regularly. Every knitter should see this. Great job, thank you.
Thank you so much !!!
Finishes are so important for knitted works!
Very clear tutorial and for a no-english-speaking knitter, pictures are very meaningful . 🙂
Amazing tutorial, thanks so much for taking the time to write this!
Thank you for a brilliant tutorial. It must have taken you a while to get everything together. Your usual high standard. It is a tutorial for every knitter to use as a reference. Best wishes Diane
Thank you . . .I use Sally Melville’s directions but I love your detailed photos and the fact that they are readily available online.
Mary Kate
Omigosh, this is fantastic! Your seaming is flawless. Thanks so much.
Now she tells me!
I recently finished, and I mean finished, your Boy Bunny pattern. Mostly in oddments of sock yarn. Thanks to your most comprehensive instructions I only got one bit the wrong way round and that doesn’t notice!
He was a commission, I shall miss him.
Thanks for such a comprehensively instructed, illustrated, and clear to follow pattern.
thank you soooo much! it was my weak point in akin rabbits… very useful!
This is such a great tutorial. Seaming is so important to a professional finish to any knitted article.
My one tip when doing increase or decrease on a garment is to do them a few stitches from the edge so you don’t have to contend with ‘steps’ while seaming.
Thanks for such a great tutorial! i always think the mattress stitch is so magical but i don’t do it very often so I will come back here to reference it. I love and enjoy your blog so much!
Thank you for this great tutorial. So detailed. You have missed nothing.
Thank you so much for the time, the bother and the brilliant results …I now have a suoer guide for any time I will need to stich!
A big hug from Italy
barbara
This is the best tutorial on seaming that I have read and the pictures, at least for me, make it so easy to understand. I am a knit in the round person, but you have given me a reason to rethink flat knitting on certain items. Thanks.
JoAnna
Excellent tutorial, Julie. I absolutely hate sewing up, and am never completely happy with the results – the revelation is sewing with the right side facing!! I have a jumper nearly knitted up, so am very happy to see this tutorial at this time – let’s see how I get on!!
Thanks so much, Julie. Best instructions ever! Have you considered writing a book?
Brilliant! I have friends who will only use back stitch, or overcast the edges which spoils there otherwise lovely knitting. I’ll try and gently direct them to your tutorial.
Thanks, Tina 😊
Thank you SO much Julie! I’ve always thought this type of seaming fiddly, but you make it so clear and simple! Now I have to start making some seams to work on 😀
I hate sewing up and have been known to knit an item and then leave it for days before biting the bullet. Thanks for this tutorial, I’m sure it will make such a difference! I agree with the comment you should write a book – you have such a fund of knowledge and experience.
Thanks, Stevie
Brilliant tutorials, Julie/ I found your blog via Pinterest. I’ve returned to knitting (via crochet and quilting) after 35 years of not picking up a pair of needles, and am just on my second pair of socks – a HUGE steep learning curve!
I have a grandson with Aspergers and two others with ADHD. (my son also with ADHD said “you do now it is familial, don’t you, Mum ..think about it!”) So I can see where some of my hyper-focus is coming from, after all these years!
Love your choice of music, I have every single one of those musicians in my cd collection, and often listen while I knit/hook/stitch. Thanks for a lovely blog! I shall be following!
Great tutorial I will find it so helpful when sewing up my blanket that’s a work in progress. Love knitting your animals.
This tutorial is just what I needed, and so clear and easy to understand.
Thank you very much.
holy buckets that is an amazing run down on how to do mattress stitch!! I know I will reference this in the future- thank you for sharing!
🙂
This is THE ultimate demonstration of the mattress seem I’ve ever seen! Thank you!
You’re amazing!! These are fabulous and so helpful. Thank you, so much.
Great tutorial and so easy to follow. Thank you so much for taking the time to do this.
Thank you so much for taking the time to explain each bit of mattress stitch so clearly! I learned to do mattress stitch seaming just this spring, from the Vogue Knitting site, but I like your clear pictures so much more. Have a wonderful day!
Thank you Julie! I love to finish the seams and I love the mattress stitch…it makes everything so neat! The only place where I have a little more of an issue is when I seam the sock and the shoe in the girl patterns in your little animals. That is the only thing I need to work a little bit more on!! Thank you so much for all your patterns I LOVE them and the people that buy the little animals I make think they are the cutest!!
Fernanda
Best tutorial I’ve ever seen on this topic. I have a friend who loves seaming….but I’ve not been a fan. Now…I’m enthused! Thank you 😊
What lovely, clear pictures and explanations! ❤ Thank you
Julie, Julie, Julie. I Love You! LOL. I’ve been knitting for a million years, and I hate seaming, because, as you correctly guessed, they look like garbage. Thank You SO much for this great tutorial – it makes perfect sense and I can’t believe I haven’t seen anything like it before. You’re brilliant!!!
This stitch is fantastic and you explain and show it so well. Thank you!
I love seaming and find it quite relaxing I have never seamed garter stitch and your tutorial is brilliant so clear and lovely photography. I have yet to knit a little cotton rabbit but am inspired to start now xx thank you😍❤️❤️
Thanks a lot for this great tutorial! I’ve always failed to produce nice seams and this is why I prefer knitting in the round, even if it’s very fiddly with small pieces!
Thank you for the very good tutorial. I would love it if at some point you could address attaching arms and legs.
Hi Julie:
Thank you so much. Your tutorial has helped me really improve my mattress stitching. I’ve searched the internet to find a tutorial that explains how to end the mattress stitch seam at the bind off edge, and haven’t found one. What do we do? After stitching through the last ladder, it seems that the bind off edges should be woven together so it looks good too. Can you help us with that? Also, someday, it would be great to know how to transition from stockinette to garter and then back to stockinette. Mine always turns out a little messy. Love, love, love, all of your patterns! Best wishes to you and yours.
Wonderful tutorial, I have struggled with mattress stitch, never turned out how it was meant to be. I followed your tutorial and my seam was perfect!!!!!.. Thank you so much
Amazing tutorial. Thank you so much!!
at first thanks you very much because you provide every information very well. its very fantastic. you explain it so well. its a wonderful tutorial,that help every persons.its improve my mattress stitching.
THANK YOU. What a perfect tutorial and so easy to follow.
Thank you for the tutorial! I am afraid I’m having trouble finding the bars as I work on the dog head below the nose (the first seam). I think the difficulty arises because of the decrease in stitches at the nose. Do you happen to have any pictures or suggestions? Many thanks.
Hi Kathy and thanks for your comment,
all of the pictures and suggestions I have about working a mattress stitch seam are already in my tutorial.
In my patterns I always keep my decreases and increases away from the edge of the work so that there’s always a clear straight stitch at the edge of the work. You will therefore be sewing the mattress stitch seam in exactly the same way as detailed in this tutorial and sewing underneath the ‘bars’ between the first and second stitch on each side of the seam – the increases and decreases will not impinge in any way of this channel between the first 2 stitches.
Hope this helps, with warm best wishes,
Julie
Hi Julie! How are you?. I want to know, if you could tell me, how do you knit the edge, because that is my nightmare. Sorry my english. Kiss María fron Uruguay